 I can’t believe my son is already a year old ! How did this happen? Where did all the time go ? It was only yesterday when we brought our tiny guy home and now all of a sudden he is a toddler. Time flew by so fast and I guess it was also because the first year is full of trails and treasures.
If I could just freeze time, I would continue to gaze in his eyes , nibble his toes, kiss his chubby cheeks and just keep listening him giggle. My heart melts thinking how fast time will slip and my child will outgrow my arms and lap in the coming years.
First birthday is a momentous occasion in any child and parent’s life. This is such a huge milestone for our family too and it warranted for a special photo shoot, so that we can savor it now and reminisce about later (like during the tumultuous teenage years)

One my favorite captures by Brianne Hardcastle Photography
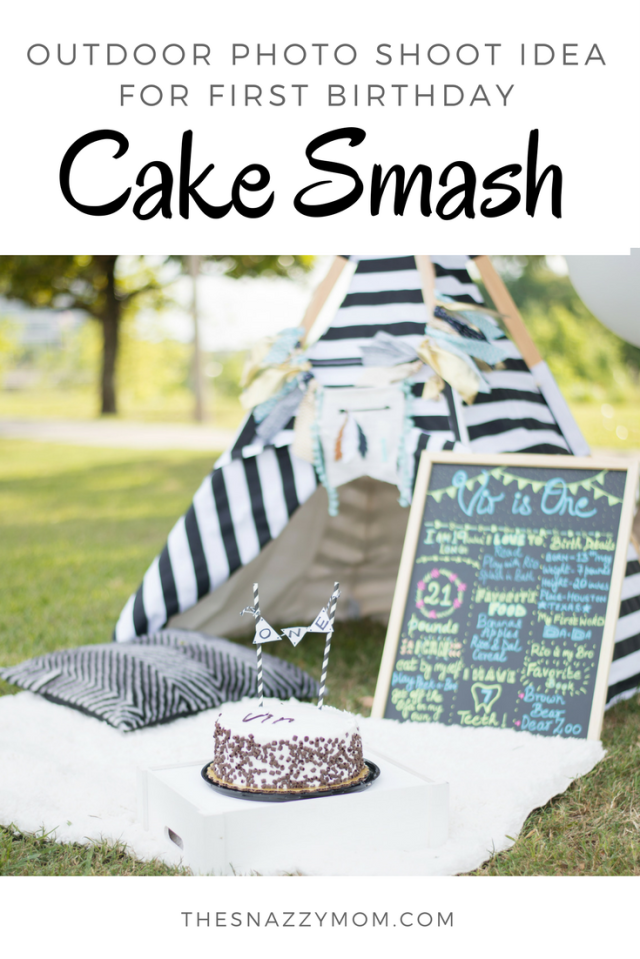
Nothing quite says beautiful mess like first birthday cake smash photography. But when you decide to go the DIY route, the results tend to be less beautiful and more mess. I am sharing on the blog few tips on how I prepared for my son’s outdoor cake smash photo shoot. I am not sure who was more excited for the cake smash session me or my son. That excitement make its pretty easy to go overboard with props, but i wanted to keep it simple.
Photography: Hiring a good photographer ensures great results.It may not always be the most ideal option to spend money on a professional, but really and truly, paying for a service makes SUCH a huge difference. I am so glad our pictures from the cake smash session have come out so beautiful. Thanks to the talented Brianne Hardcastle who was committed to capture the best moments. Check out her FB Page for more details.
Location: We wanted to shoot outdoors as it was in tune with our theme and also excellent for good lighting and for that we choose the Bayou Bend Park in Houston.
Keeping Props Simple: An outdoor shoot saved us from all the expensive background decorations and detailing. I used item that were available at my home.
- The Teepee was the main prop that was central to the entire theme. My son’s lovely Teepee is from – Tnees Teepees. They have a wonderful collection of modern and stylish teepees for boys and girls that look great in any room. I also used a white rug and a cushion under it .
- Cake: Of Course a cake is the highlight of the cake smash photo shoot, you can use different colors according to your theme. I didn’t want to spend too much on it either, so I went for a simple white butter cream chocolate cake.
- DIY Cake Topper: Since the cake was very plain and simple , I added some fun to it by making a cake topper with paper straws. I used a craft thread and cut paper triangles and wrote ONE with a sharpie on it and glued them. You can also buy some really nice cake toppers online.
- DIY Chalkboard first birthday sign– The details of your child’s first year can be forgotten over time, but with a stunning Chalkboard First Birthday sign, you can cherish them forever! I made this chalkboard with some inspiration from Pinterest. Took me an hour to work on it. You can also get one professionally down from etsy and print it .
- A huge Balloon can cover a lot of space for pictures and also add a pop of color. I used a white one as it went with our theme. This is a 36 inch balloon.
- Fabric banner: The only main decorative piece I really splurged on was the fabric banner that I got from Etsy (displayed on the teepee). It can also be used as a garland or even a high chair decorative piece. I also used it for decorating Vir’s high chair at his birthday party at our home.
- Outfit: My sister got Vir his cake smash outfit , she bought it from amazon . There are some great shops on etsy to you can buy cute cake smash outfits . Note its really hard to get something unique for boys.
Color coordinate: I stuck to a low a key background with white , black and natural green for keeping the pictures neat and bright. Start with one item that you would like to coordinate in the session then, add in colours that coordinate or complement that item.


All these beautiful moments are captured by Houston Based Photographer Brianne Hardcastle. Click here more info
Timings for the cake session is very essential : You want it to be stress and fuss free. I planned the session in the evening after my son’s nap time. The weather was great too. (And yes, it’s perfectly fine if the cake smash photos aren’t done on their actual birthday.)
Get the baby to dig in: Our son was shy to dig in the cake after he touched the frosting. He was weirded out by the sticky texture. I got our dog to join the party and also put my finger in the cake to excite him about the process.

I had to frame this !! He won’t stay so little anymore
Post session Clean up : This is one thing I completely forgot about, while rushing for the shoot from our home. You need to have paper towels handy, plastic/paper bags to throw away the mess. And a spare change of clothes for the kid after the session is over.
The first birthday cake of our child was a huge milestone for us. And so for that reason I took a break from taking a few cell phone photos and completely avoided the plastic highchair cake smash experience. This was truly a momentous celebration and I hope these tips can help you prepare for your big occasion.
You can see his birthday party video at our home on my Instagram page
#letthembelittle
Love


Adorable. Happy 1st Birthday 🎂 to your son.
LikeLike
glad you liked it
LikeLike
This is so cute!!
LikeLike
adorable! We didn’t do a smash cake photo shoot but had one at her birthday party.
LikeLike
these moments are precious right!
LikeLike
So adorable! Turning one is such a big milestone, and I’m glad you were able to capture some great shots of your little guy!
LikeLike
Thanks Megan glad you like it
LikeLike
Love these ideas! Everything looks so cute. Great pictures!
LikeLike
Love this setup!!!! And your dress is to die for!
LikeLike
My daughter will be one on the 28th so I especially loved reading this! Thanks for sharing!
LikeLike
Well done – it’s so perfect! love everything!
LikeLike
Cake smashes are the best! I wish they could happen every year!!!!
LikeLike
Happy birthday Vir! Love your birthday planning. The decorations are simple and lovely!
LikeLiked by 1 person
Thanks Uma glad you like it
LikeLike
These pictures are so adorable! The teepee is seriously the cutest:)
LikeLike
these came out so cute! Great job!
LikeLike
Such a great idea and such beautiful photos!! Mine turns one in one month!! I love this outdoor shoot idea for it 🙂
LikeLike
I am glad you like it! Definitely go for outdoor shoot if you can
LikeLike
I am on baby number 4 and have never done a smash cake for my kids. What’s worse–I am also a cake decorator. For shame! I am DEFINITELY doing one for my currant baby, because these smash cake photo shoots are just too cute. Your little one is adorable! Thank you for these tips : )
LikeLike
This is the cutest set-up!!! Neither of my girls were in to smashing the cake but that’s probably because it was at their party with so many people. I love this!!
LikeLike
Hi. Absolutely beautiful pics. Can you please tell where did you buy your dress from. thanks 🙂
LikeLike
Hi this is from bcbgmaxzariab❤
LikeLike
Awww!! Looks like a great time!!
LikeLike